[DRAFT] CI/CD Pipeline and Release Process
This document outlines the process for managing Salesforce development, testing, and deployment using Git Flow, Jira, and GitHub Actions. It covers how to handle feature branches, pull requests, sandbox testing, and the release process.
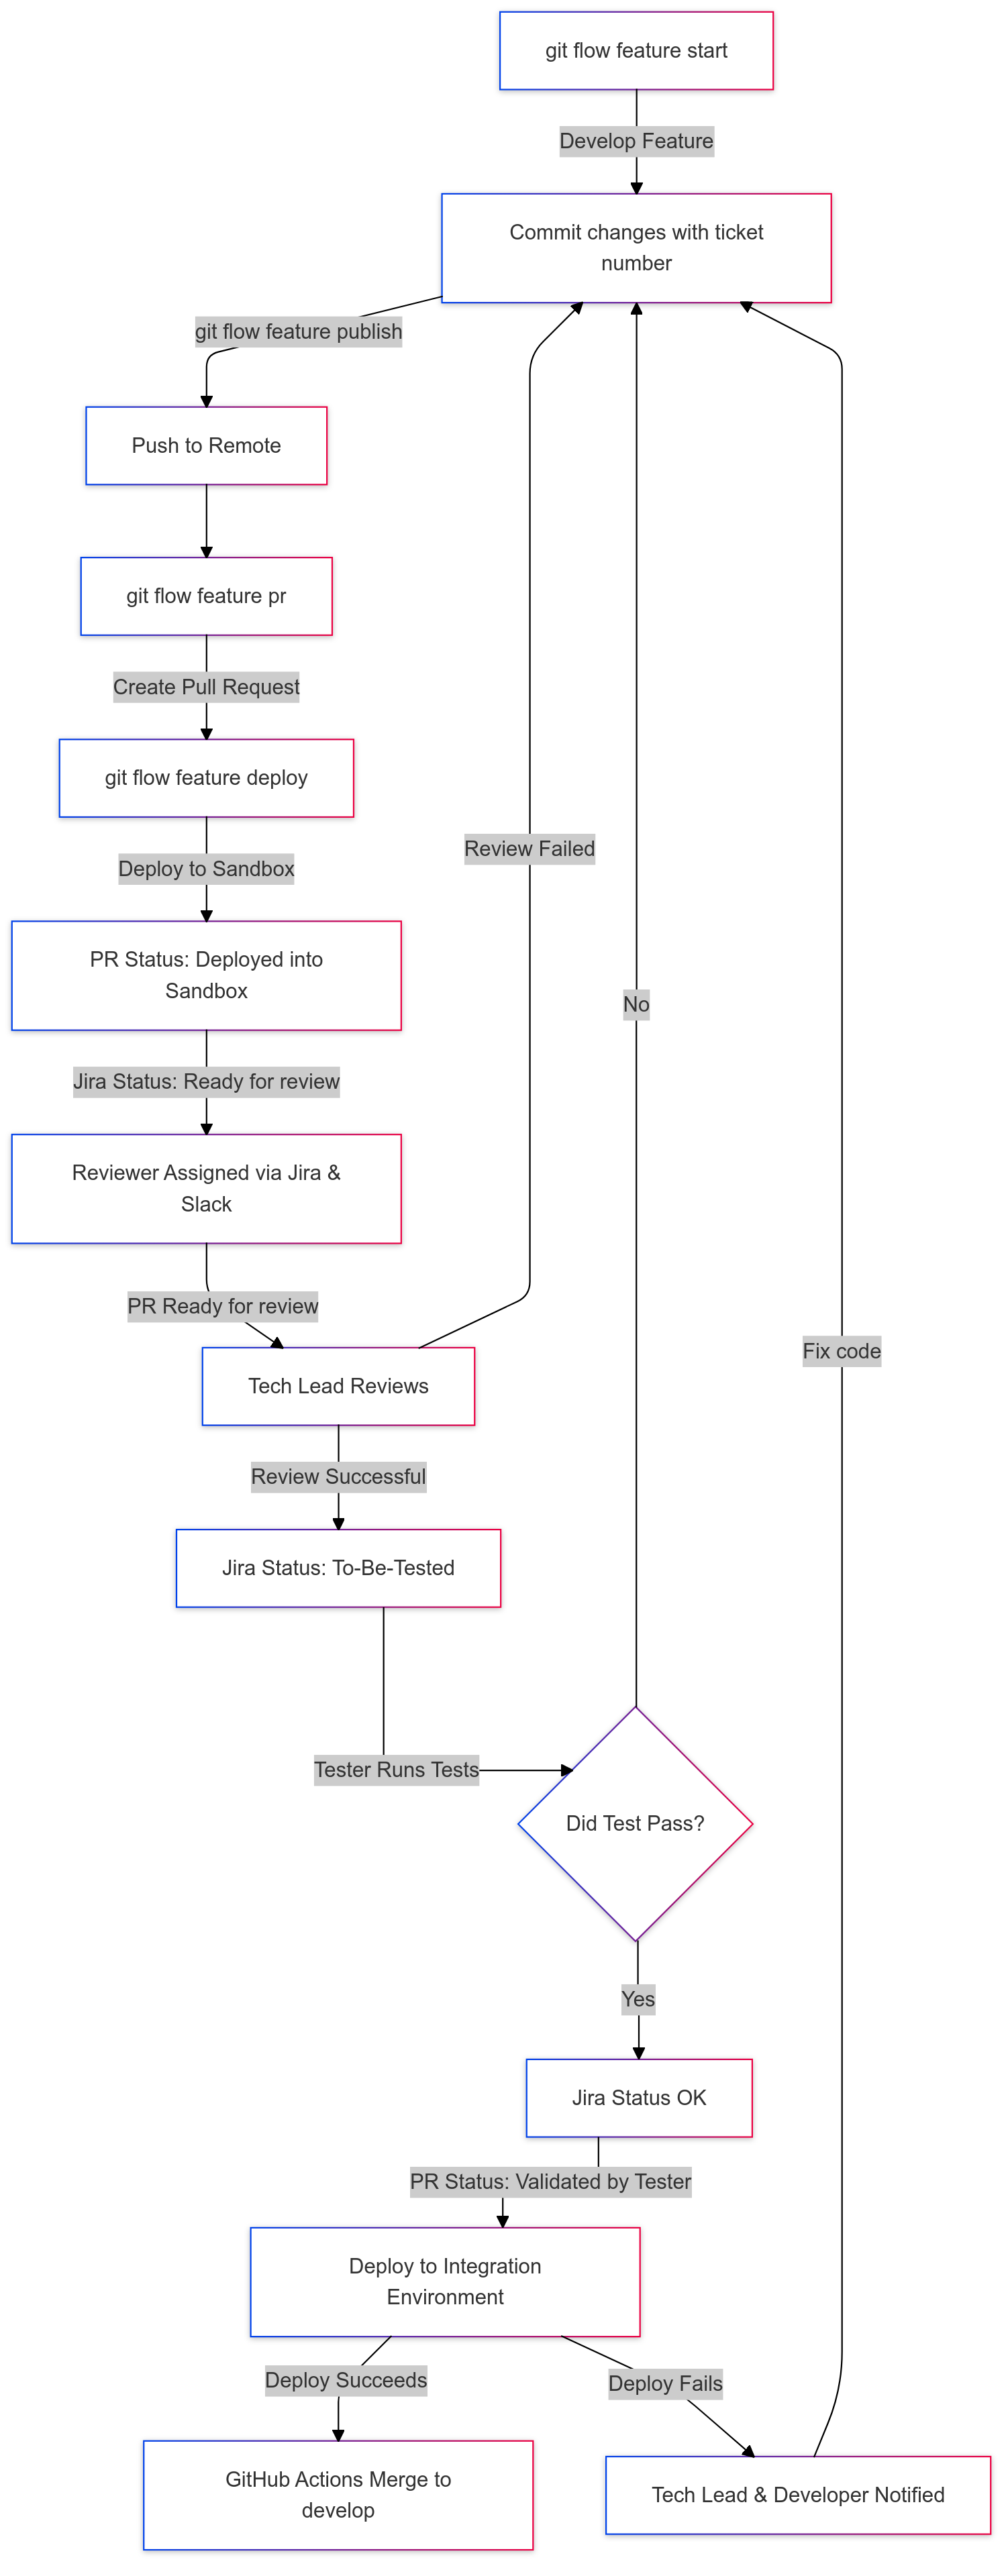
Feature/Hotfix Management
1.Feature/Hotfix Branches
- When a developer takes a Jira ticket, they must create a feature or hotfix branch using Git Flow.
- The branch name should include the Jira ticket number for easy tracking.
git flow feature start OTB-123- All commits must also reference the Jira ticket number.
git commit -m "OTB-123: Added validation rule"Publishing the Branch
- Once development is complete, the branch must be published to the remote repository.
git flow feature publish2. Creating a Pull Request (PR)
After publishing the branch, create a Pull Request (PR) to merge changes into the develop branch.
git flow feature pr3. Sandbox Setup
When a developer triggers the git flow feature deploy command, the system will automatically set up a Salesforce sandbox for testing:
- The system will prompt the developer to choose a target sandbox.
- Once the deployment is successful, the PR is updated with the status deployed into sandbox.
git flow feature deploy4. PR Review Process
Once the PR is deployed to the sandbox and labeled as deployed into sandbox, the developer can proceed with the review step:
git flow feature reviewThis command updates the PR to Ready for review and notifies the assigned reviewer via Jira and Slack.
- The tech lead reviews the PR.
- If the review is successful, the Jira issue is updated to to-be-tested.
5. Testing and Validation
Once the PR is reviewed and the Jira issue is marked as to-be-tested, the tester performs the necessary tests:
- If the test passes, the Jira issue is moved to OK status.
- The PR is updated, and the ticket is labeled Validated by Tester.
6. Integration Environment and Merging
After the PR is validated by the tester:
- The changes are deployed to the Integration environment.
- If the deployment to Integ fails, the tech lead and the developer are notified.
- If the deployment succeeds, the PR is automatically merged into the
developbranch.
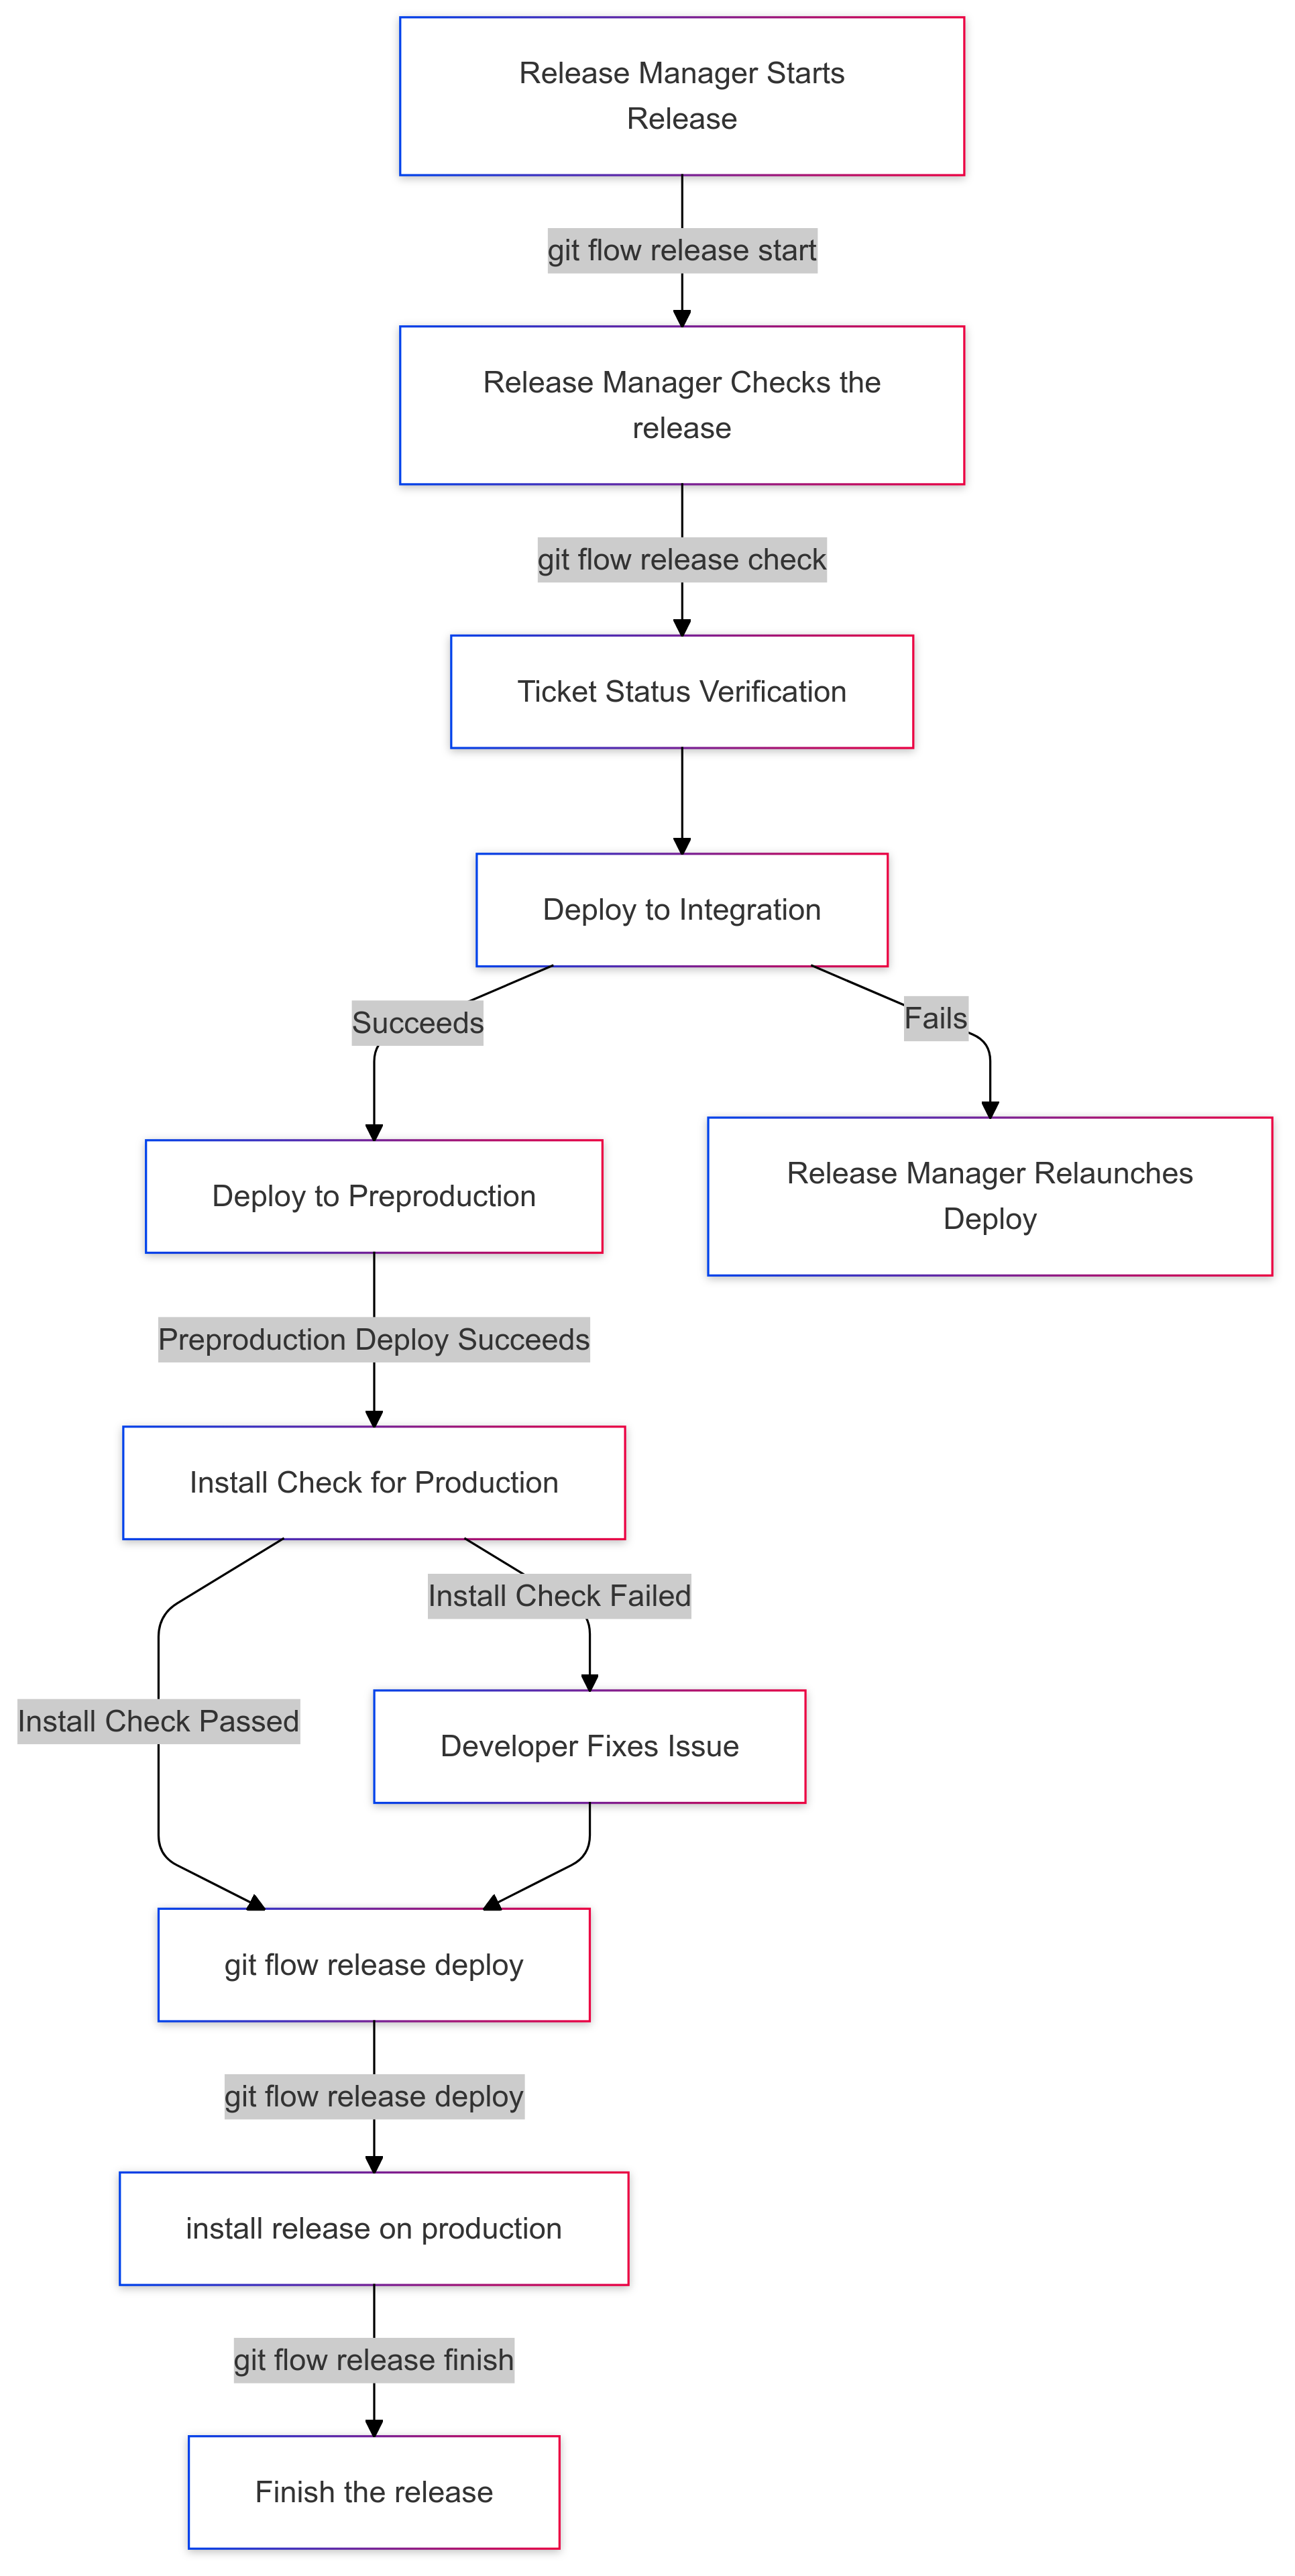
Sprint Release Process
At the end of the sprint, the Release Manager creates a release using the following command:
git flow release start <version>Before proceeding with the release, the Release Manager runs a check to verify the state of the tickets included in the release:
git flow release checkWhat Happens During git flow release check?
- Ticket Status Verification: The system verifies that all tickets in the release are in OK status and have not been reverted. If any ticket is reverted and is in OK status, or is not in OK status, the release process will halt.
- Integration Deployment: The release is deployed to integration.
- Preproduction Deployment: The release is then deployed to preproduction.
- Production Installation Check: If the preproduction deployment passes, the system performs an installation check for production.
- Update Jira: Jira tickets statuses are moved to to-be-deployed.
Sprint Release Process
At the end of the sprint, the Release Manager creates a release using the following command:
git flow release start <version>Before proceeding with the release, the Release Manager runs a check to verify the state of the tickets included in the release:
git flow release checkWhat Happens During git flow release check?
The git flow release check process differs slightly based on whether the project is a Salesforce project or a Qovery project. Here’s a breakdown of each.
For Salesforce Projects
-
Ticket Status Verification: The system verifies that all tickets in the release are in OK status and have not been reverted. If any ticket is reverted or is not in OK status, the release process will halt.
-
Integration Environment Installation: The release is deployed to the integration environment for initial testing to ensure Salesforce customizations, configurations, and code work as expected.
-
Preproduction Deployment: Once integration testing is successful, the release is deployed to the preproduction environment. This allows for further validation and testing in an environment that closely resembles production.
-
Production Installation Check: If the preproduction deployment is successful, the system performs an installation check in the production environment to ensure readiness.
-
Release Candidate Creation: A release candidate (RC) tag is created on the release branch (
v1.2.0-rc1). This RC tag is pushed to GitHub, which triggers a GitHub Action to automatically create a draft release. -
Update Jira: Jira ticket statuses are updated to to-be-deployed to indicate that the release is ready for final production deployment.
For Qovery Projects
-
Ticket Status Verification: As with Salesforce projects, the system verifies that all tickets in the release are in OK status and have not been reverted. Any issues with ticket statuses will halt the release process.
-
Release Candidate Creation: A release candidate (RC) tag is created on the release branch (
v1.2.0-rc1). This RC tag is pushed to GitHub, which triggers a GitHub Action to automatically create a draft release. -
Staging Environment Deployment (Qovery): Once the draft release is created, Qovery listens for the draft release and deploys the application to the staging environment for final testing.
-
Update Jira: Jira ticket statuses are updated to to-be-deployed to signal that the release is ready for production once staging deployment passes all checks.
Here’s a merged and streamlined version of both sections, combining the finalization steps for GitHub and Jira with deployment success and failure handling:
Finalizing the Release in GitHub, Jira, and Deployment Environments
Once all tests are successful and the release is ready for production, the Release Manager proceeds with final deployment and documentation steps.
If All Checks Pass
-
Deploy the Release:
- For Salesforce projects, the Release Manager begins production deployment by running:
git flow release deploy - For Qovery projects, this step is optional, as Qovery handles deployment automatically upon detecting the release.
- For Salesforce projects, the Release Manager begins production deployment by running:
-
Complete the Release:
- After verifying deployment readiness, the Release Manager completes the release:
git flow release finish <version> - This command merges the release into both
developandmainbranches.
- After verifying deployment readiness, the Release Manager completes the release:
-
Finalize the GitHub Release:
- A GitHub Action can automatically update the draft release with the final release tag, publish it as an official release, and add any notes from a template or specified file.
-
Create a Release in Jira:
- A separate step in the GitHub Action (or a follow-up workflow) can trigger a script that uses Jira’s API to create the release version in Jira, associate the relevant issues, and mark it as released upon successful deployment.
If the Deployment Fails
If deployment fails at any stage:
- The Release Manager is notified and must reattempt the deployment using:
git flow release deploy
This process ensures that each release is thoroughly tested, documented, and finalized across GitHub, Jira, and deployment environments.
Summary of Commands
- Start a feature branch:
git flow feature start OTB-123 - Publish the branch:
git flow feature publish - Create a PR:
git flow feature pr - Deploy to sandbox:
git flow feature deploy - Ready for review:
git flow feature review - Start a release:
git flow release start <version> - Verify and check the release:
git flow release check - Deploy a release:
git flow release deploy - Finish a release:
git flow release finish <version> - Relaunch a failed deployment:
git flow release deploy